As of 10th September, AWS, GCP and Azure appear to have been blocked from accessing the Tesla API, causing lots of 3rd party providers to have to change servers and many of us running our own self hosted data logging tools to also move. EDIT – Working on GCP again as of the 15th September 2020 – link to that guide on the bottom of the page.
Here’s how to setup and run TeslaMate on a Digital Ocean Droplet server:
Sign up for a Digital Ocean account
First off, you’ll need to register for a Digital Ocean account, if you use my referral link it gives you $100 credit, however it’s only valid for 60 days, so consider it a 2 month free trial instead! The Droplet server is $5 a month once your credit / 60 days are up.
Sign up for a Digital Ocean account with link for the free 60 days of TeslaMate access
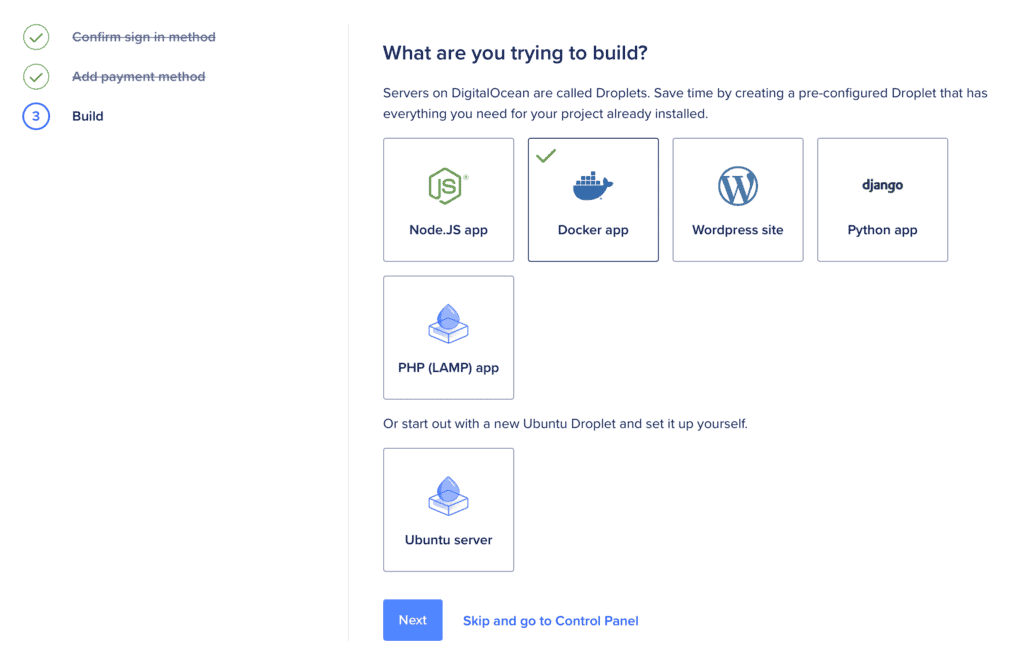
Once you’ve created your account, setup and setup a payment method you are then prompted to find out ‘what are you trying to build’. Choose the Docker app

You will now be asked to choose some customisation options, I left everything as it was, but changed the data centre location to the nearest one to me, London in my case. It asks you for a password, this is the password you’ll use for SSH access, so make sure it’s something easy to remember / type! You can now create the Droplet.
Once the Droplet is live, you’ll have an IP address that you’ll need for the next steps.
Create a subdomain
TeslaMate instructions now recommend creating a single teslamate subdomain, it can be simply teslamate.mydomain.com (replacing mydomain.com with your domain name) or something else, this is completely up to you, you’ll just need to make changes in the .env file later on to make sure this works for you.
For this subdomain, you need to change the DNS setup so that the subdomain has an A record that points to your public facing IP4 address of your Digital Ocean Droplet server.
Wait for the DNS changes to propagate
Before proceeding, wait until your DNS changes have been reflected. Ping your new subdomain URL (teslamate.MYDOMAN.COM) when you get a positive result that matches the public IP of your Droplet server you are good to proceed. This won’t be instant and will depend on the DNS management service you are using.
SSH into your new server
Now the server is live and your DNS changes have propagated, you’ll need to SSH in so you can install Docker Compose and TeslaMate.
Using the IP4 address of your box, open up your preferred SSH client (Terminal on a Mac for me) and run: ssh root@ip.address.of.your.droplet
You’ll then be prompted for the password, which you setup earlier.
Docker Compose install
Run the following commands one after the other:sudo curl -L https://github.com/docker/compose/releases/download/1.26.1/docker-compose-`uname -s`-`uname -m` -o /usr/local/bin/docker-composesudo chmod +x /usr/local/bin/docker-compose
Create a swap file
Due to the Droplet not having a huge amount of memory, this just gives the box a bit of breathing space.
Run the following 2 commands one after the other:sudo fallocate -l 1G /swapfile && sudo chmod 600 /swapfile && sudo mkswap /swapfileecho "/swapfile swap swap defaults 0 0" | sudo tee -a /etc/fstab && sudo reboot
Once the box has restarted, continue to the next step.
Install TeslaMate
You can now follow this guide: Advanced Traefik TeslaMate install
For those unfamiliar with how to create the files in the above guide, I use the nano editor. For example, to create the docker-compose.yml file, type the following into your SSH session: nano docker-compose.yml this will load up the nano editor, allowing you to use your familiar PC/Mac copy/paste commands to get the content in.
Once you’ve finished editing the file(s), Ctrl+X to exit, choosing Y to save the file
I’d advise when first starting up TeslaMate, you run the following just so you can check for any errors: sudo docker-compose up
With the above, you’ll see it getting everything installed, hopefully with no errors. Check your new URLs, if you’re a new user login to the teslamate URL, if you’re an existing user moving over to cloud from local you should do a restore of a previous backup before signing in.
Your two URL’s to access Teslamate will be (replacing mydomain.com with whatever you’ve chosen, if you’ve replaced teslamate with something else, you’ll need to substitute this too;
Teslamate control panel (login, settings, geofences etc..): teslamate.mydomain.com
Grafana dashboards (all of the charts etc..): teslamate.mydomain.com/grafana
To access the dashboards once you’ve signed into Grafana, click Home near the top left, the dashboards are then within the Teslamate, Reports and Internal folders.
Once you’re happy everything works, in the SSH window, you can quit the docker-compose session with Ctrl+C, then restart it with sudo docker-compose up -d
Extras
Now you’ve got everything installed, here are some extra steps you can take to bulk import useful Supercharger / Destination charger data, setup a backup and even monitor TeslaMate so you receive an email should it be down or you get logged out (which stops data from flowing).
How to do an automated backup of TeslaMate to Google Drive (make sure when creating the script you adjust the script paths accordingly).
Bulk import UK Supercharger locations into TeslaMate
How to bulk import UK destination charger locations into TeslaMate
Setup monitoring to ensure your TeslaMate Google Cloud instances are up and running
Google Cloud (GCP) free tier alternative
If you’d prefer to run this on Google Cloud, here’s how: How to setup and run TeslaMate on Google Cloud (GCP) for free
